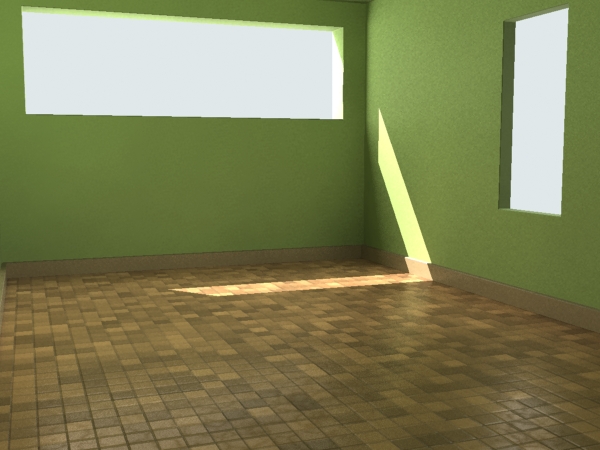
For this tutorial, we’re going to explore mental ray by making a simple room and lighting setup. I’ll be using 3dsMax 9 but you can follow along with any version. I’m also including my finished file so you can pick it apart if it suits you.
Now I’m assuming a low, but non-zero level of previous knowledge during this tutorial. Specifically, that you’ve been using scanline for a few days or weeks and would like to extend your knowledge to include mental ray. While I’ll include images and try to go step-by-step, Remember that mental ray isn’t for those just starting the program for the first time.
Step 1: Build a box and flip its normals.
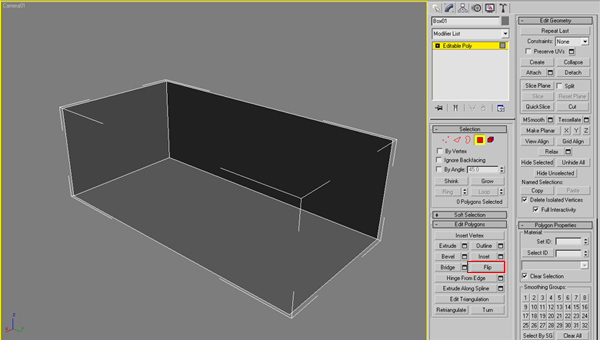
I’ll start off by making a box that’s 200x100x70 that’s the basis of my room.
Convert it to an editable poly object by right clicking and selecting editable poly.
Select all the polygons and in the Edit Polygons rollout, select “Flip”.
Step 2: Make some windows and details.
Feel free to deviate slightly from the tutorial at this point if you’re feeling confident. I’m going to create a single window at one end of the long-ish room. However, you could do some pretty ambitious stuff with the roof, creating a long skylight and then putting up rafters and plants. Oh my! But for me, and for the sake of some beginners out there, I’m going to keep it easy and direct for now.
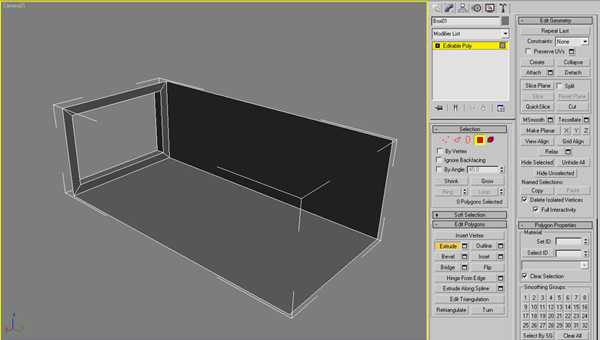
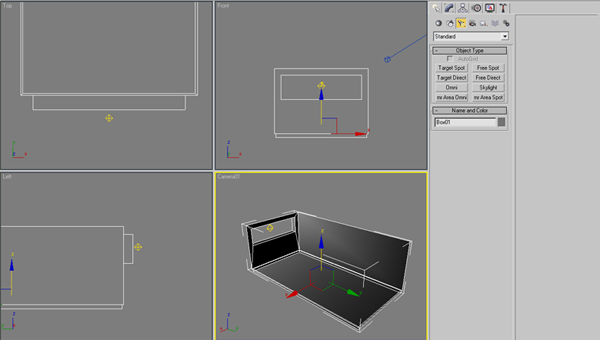
Select the polygon at the end of the hall and inset it, then extrude it with a negative value. If you want to resize the window you can. I’ve selected the bottom polygon of the window sill and moved it up a bit.
Delete this polygon. This will form our window!
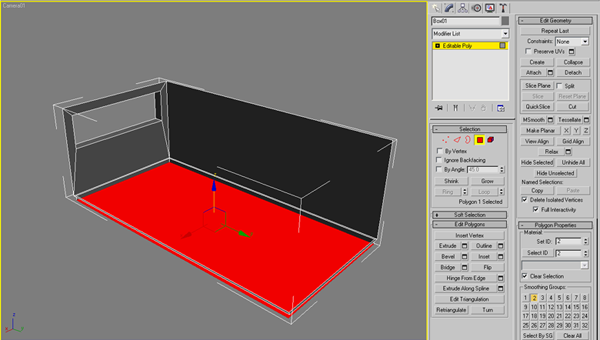
Select the floor polygon. Inset it a little bit, and then extrude it down to form a baseboard. This is a minor stylistic thing that always adds a little realism to the room! I’ve also taken the artistic liberty of raising the base of the window a little higher.
Now we have the makings of a basic room. Go ahead and save your work. Always a good practice.
Step 3: Switch to mental ray and create some lights.
We need to enable the mental ray renderer, since the scanline is being used by default. Hit F10 for your render settings panel and under the “Common” tab in the “Assign Renderer” rollout, hit the “…” next to production and select t the mental ray renderer. For a shortcut, in the little pink box in the lower left corner you can type
renderers.production = mental_ray_renderer()
Super! Let’s get some lights in here. Under your create panel, go to the lights group, and select an “mr area omni”. Place it at the base of your window sill in the perspective viewport. Move it up so that it’s just outside your window.
Step 4: Scene adjustment.
Take a render (Shift-Q). Hmm…not quite what we want yet, is it? That’s ok, I know just the trick!
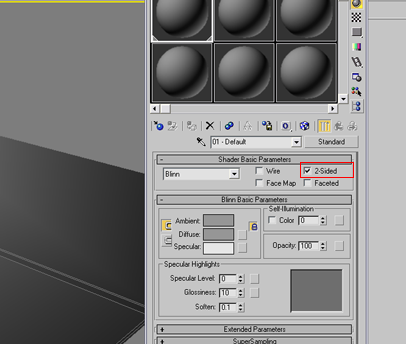
For starters, we need the polygons of the room to be double sided so that light doesn’t leak in from the walls. Hit your hotkey “M” and open the material browser. Drag and drop any grey material from the browser onto your room object and the material will be applied. Select the “2-sided” checkbox in the material you just dragged over.
If you render again, you’ll realize that now we can’t see inside the room! That’s because the walls are now impenetrable. We need a camera on the inside of the room. Under your create tab, go to the cameras group and create a target camera inside the room by clicking and dragging.
You can switch to this camera by pressing the “C” key. Reposition the camera if you feel the need to. It was likely created at ground level, and that’s not quite right.
Now if you render you get a much better perspective on things. If you’re having trouble, it could be because the camera is not entirely inside the room, or it’s not pointed in the right direction.
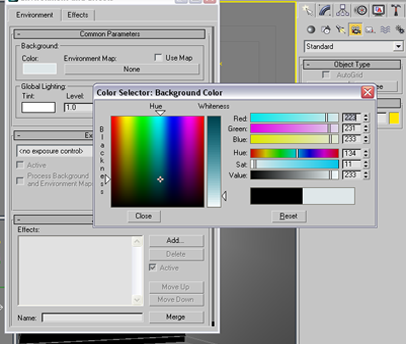
Next, go ahead and hit your “8” key or go to the tool bar “Rendering”>”Environment” and click the black swatch under background color. Pick a very light blue color. That will make it look a little more like the light coming in the room is real.
Step 5: Use Final Gather.
Re-render the image, and you’ll see that it’s looking even better now!
But something is still off with the light. I bet if we enable final gather it’ll look twice as good! Final gather is a light bouncing solution in mental ray similar to 3d Studio Max’s native radiosity. If we turn it on, the light will cast around the room in a much more realistic way. If you’re using 3dsMax 2009, final gather is probably on by default so you can effectively skip this step.
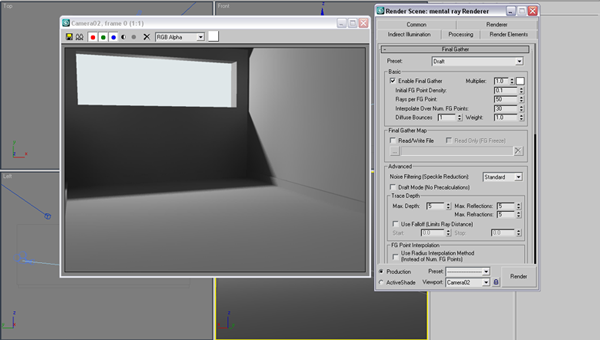
In your render settings window (F10) you’ll see an “Indirect Illumination” tab. Click on the checkbox that says “final gather”, select “Draft” from the quality preset pulldown, and change your bounces from 0 to 1.
Re-render your image. Now we’re cooking!
Step 6: Make the spherical light project properly.
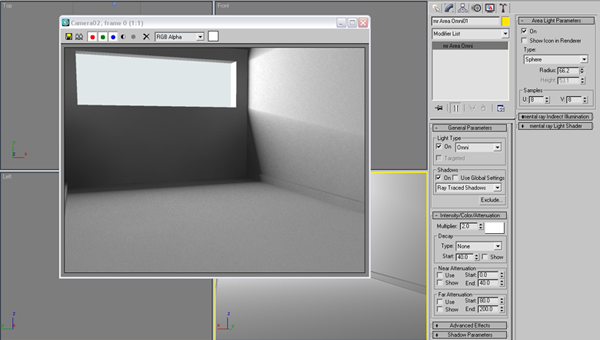
What do you say we make that light source look like it’s really from outside? Select the mental ray light, and under the modify panel, click on the “area light parameters” rollout. We want to change the height and width of the area light to fit the window better. The window is the lightsource. Increase the radius of the light such that it can reach the left and right sides of the window, even if it starts protruding into the room. Use the scale tool to scale it such that it becomes a big flat disk right outside the window. You’ll have to twiddle the radius spinner to see the size of the disk, so don’t hesitate to do a guess-and-check kind of approach. Don’t worry too much, this isn’t that critical.
Re-render, and you’ll see the lighting solution really coming to life. It’s a little graining and dark, so we’ll have to increase the intensity of the light. In addition, change the samples on the light from 5 and 5 to 8 and 8. This will increase the sampling of the shadows and remove some of that grainy texture. Note that this change will increase render times, so if it becomes difficult for your system to handle, leave it low until you’re ready for a final render!
Cool beans! Now I’m going to let you try out whatever you want on this scene. Put some materials around the room and see how they render. Maybe make more windows or direct lights and let the light sources interact and brilliantly light up the place. It’s your call! I encourage you not to skip this step. Playing around is what really teaches you how to use this program, tutorials like this are supposed to get you to that stage.
I’ve done a few things to my scene, and you can check them out at your leisure. The biggest changes are the extra light sources, a few lighting tweaks like intensity, and the materials.
If you have any questions, you can always find me on the 3dTotal Forums and PM me (Bluesummers-3dt).
Until next time, happy rendering!



By Mental Ray Lighting Tutorial | MrBluesummers.com February 2, 2009 - 9:12 pm
[…] any version. I’m also including my finished file so you can pick it apart if it suits you. Click here for more! Tags: Help, mental ray, Old Blog, Tutorial Category: Tutorial You can follow any responses to […]
By mimi May 1, 2010 - 9:16 am
thanke u so much
By Camilo August 20, 2010 - 4:52 am
Men thanks so much i really needed this tutorial…
By laam September 21, 2010 - 4:53 pm
thx
By Sayotto Ahasan February 21, 2011 - 11:23 pm
Thankx!
By john July 12, 2011 - 8:45 pm
Hi
Bluesummers.
So far you got the best tutorial in term of simplicity, I loved that.
If it interest you please make a tutorial on exterior lighting with realistic look.
Again, thanks for the tutorial!
By romeo December 10, 2011 - 11:38 pm
Hi, Mr BlueSummers.
First of all, thank you for all your work. It’s fantastic and helpful.
Well, I’m following all steps in this tutorial but something is wrong with my face polygon (the window one). In rendering, I get a tiny white line all the way around the polygon edges. It’s like outlined.
I’ve made lots of tries but I can’t get rid of this issue.
Thanks
By Dominic December 29, 2011 - 11:20 pm
Is there anyway I could endorse you for the work, because a lot of this has helped me a great deal and I’ve been looking everywhere for tutorials like these.
By Lalla November 23, 2012 - 6:31 pm
Ti amo!